How to install Keras with a TensorFlow backend for deep learning
Some of the biggest challenges I've faced while teaching myself data science have been determining what tools are available, which one to invest in learning, or how to access them. For example, once I reached the stage in my training where I was ready to add deep learning to my repertoire, I was baffled on how troublesome it was to setup Keras and TensorFlow to work with Jupyter notebooks via the Anaconda distribution. Most solutions glossed over key steps, others just didn't work. After some digging, I came up with my own solution and decided to share it in detail with the community.
Update (May 13, 2019): This blog post is nearly two years old, which makes it prehistoric in the data science world. Steps 3-4 for installing Keras and TensorFlow are still relevant. However, I don't recommend using Windows directly as a development platform for data science; I don't even advise using Anaconda! Up-to-date recommendations for gearing up for data science work, in addition to instructions for transforming Windows into a viable development platform can be found on a recent blog post.

I settled on Keras because it provides a high-level, user friendly API for several deep learning libraries such as TensorFlow, Theano or Microsoft Cognitive Toolkit. Because TensorFlow is an order of magnitude more popular than the rest and is growing rapidly, it was the logical choice for Keras' backend. Thankfully, both libraries are written in Python, which circumvents a layer of friction for me.
Table of contents
- Setting up Anaconda
- Adding Anaconda to the Windows PATH
- Setting up a virtual environment for deep learning
- Verifying the installation
Note: this tutorial is for Windows users. Apologies!
1. Setting up Anaconda
Anaconda is a free and open-source software distribution for data science. In a nutshell, it's an up-to-date, comprehensive bundle of the most popular tools and libraries in this field and enables you to dive in quickly and easily.
Of course, you could use pip, Python's default package manager, to install these libraries but that would likely take a while considering there are hundreds to choose from. In addition, newcomers typically don't know which libraries are useful and which are optional. Most importantly, a library may build off another library (the latter is called a dependency), so it's crucial to install them in the correct order and use the appropriate version of each one to ensure all libraries play nicely.
Fortunately, Anaconda takes these responsibilities off your shoulder. First, the installer comes with the core libraries for data science to get you up and running immediately. In addition, Anaconda includes a language-agnostic package manager called conda that enables you to add more libraries later.
As the cherry on top, conda is also a top-notch virtual environment manager, so you don't need virtualenv or venv. For those new to virtual environments, think of them as tools to keep dependencies used by different projects or tasks in separate locations to avoid potentially messy conflicts. Later in this tutorial, we'll create a conda environment for our deep learning tasks.
To get started, download Anaconda with the latest version of Python—don't worry, you can always create a conda environment that uses an older version if needed. The installation will take a few minutes so grab a coffee!
2. Adding Anaconda to the Windows PATH
Continuum Analytics, the company that maintains Anaconda, elected to remove the option to add the distribution to the PATH variable during the installation process in version 4.4. Basically, this allowed you to interface with conda via the command line instead of the GUI-based Anaconda Navigator, which I find clunky. Because we need to access the command line to install Keras and TensorFlow, this step is mandatory. No problem—manually adding Anaconda to the PATH variable is super easy.
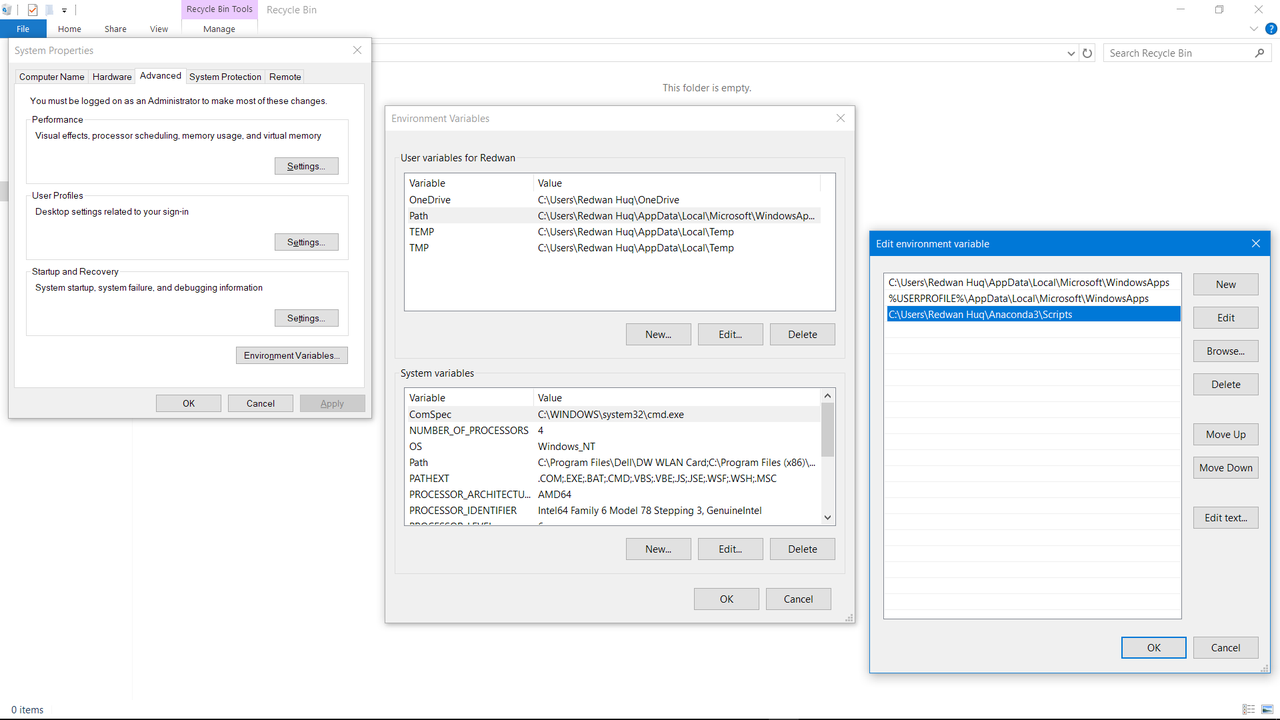
- Open the Start menu, start typing "environment" and select the option called Edit the system environment variables
- Select the Environment Variables button near the bottom
- In the top section containing user variables, select the one called Path and choose to edit it
- Create a new variable whose name refers to the location of the "Scripts" folder, which is inside whichever folder you chose to install Anaconda
Take a look at the example below if you need help.
3. Setting up a virtual environment for deep learning
Let's begin by opening Command Prompt and creating a new conda environment with Python.
conda create --name deeplearning pythonFeel free to change deeplearning to whatever you'd like to call the environment. You'll be prompted to install various dependencies throughout this process—just agree each time.
Let's now enter this newly created virtual environment.
activate deeplearningIf you're following along in Command Prompt, notice the prompt is now flanked by the name of the environment in parentheses—this indicates you're inside.
Earlier, the Anaconda installer automatically created a conda environment called root that houses the core libraries for data science. Since we've now moved into a different environment, we can't access those libraries unless we re-install them and their dependencies in the new environment. Fortunately, we can use conda to install a few packages that cover everything we need. Because I make heavy use of the core data science libraries, I installed every package listed below.
Jupyter is a must for those who rely on notebooks for data science (who doesn't?).
conda install jupyterPandas includes the de facto library for exploratory analysis and data wrangling in Python.
conda install pandasScikit-learn contains the go-to library for machine learning tasks in Python outside of neural networks.
conda install scikit-learnWe're finally equipped to install the deep learning libraries, TensorFlow and Keras. Neither library is officially available via a conda package (yet) so we'll need to install them with pip. One more thing: this step installs TensorFlow with CPU support only; if you want GPU support too, check this out.
pip install tensorflow
pip install keras
4. Verifying the installation
A quick way to check if the installation succeeded is to try to import Keras and TensorFlow in a Jupyter notebook. Here are two ways to access Jupyter:
- Open Command prompt, activate your deep learning environment, and enter
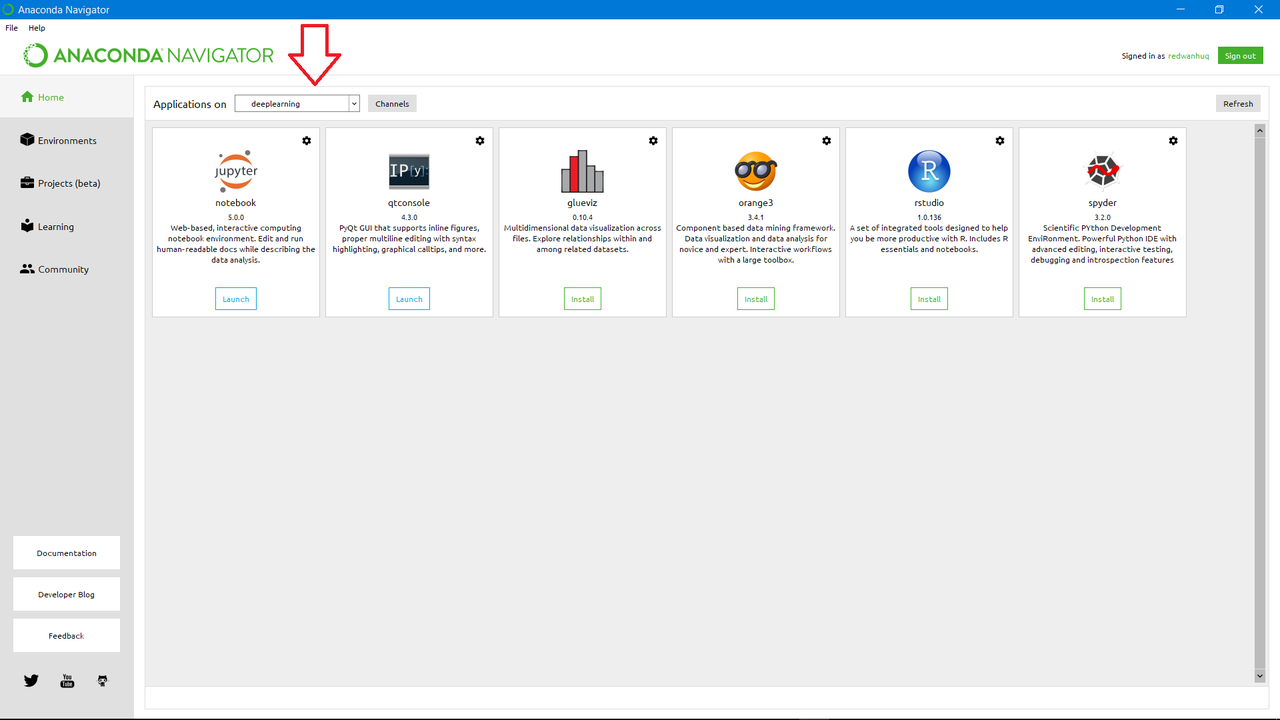
jupyter notebookin the prompt - Open Anaconda Navigator (use the Start menu shortcut), switch to your deep learning environment in the Applications on drop-down menu, and then choose to open Jupyter
The first option is a lot faster. If you missed a step or made a mistake, you can always remove the conda environment and start over.
conda remove --name deeplearning --allOtherwise, you should have TensorFlow and Keras ready to go. Go forth and start and building! As always, don't hesitate to leave your comments below.
Comments
Comments powered by Disqus